Thursday, December 6, 2012

Week 1 of Elf on the Shelf

So I broke down and adopted an Elf. Mind you, my older boys (whom still live with us) thought this was the creepiest thing they ever saw. And David, well he's only 16 months so he really doesn't care about him (yet). But my hubby and I are loving him!

So when he arrived I made it a point that the whole family had to agree on a name for him. CJ and Cordell liked this idea. And we settled on Hermie. (You know from Rudolph the Red Nose Reindeer.) There wasn't many options prior to Hermie we all loved the idea.

So this is what Hermie has been up to for the past week.

Night 1-  I went to go read David the story and when I returned to put the book back with the box I noticed Hermie was missing. I later found him in the coffee cup cabinet.


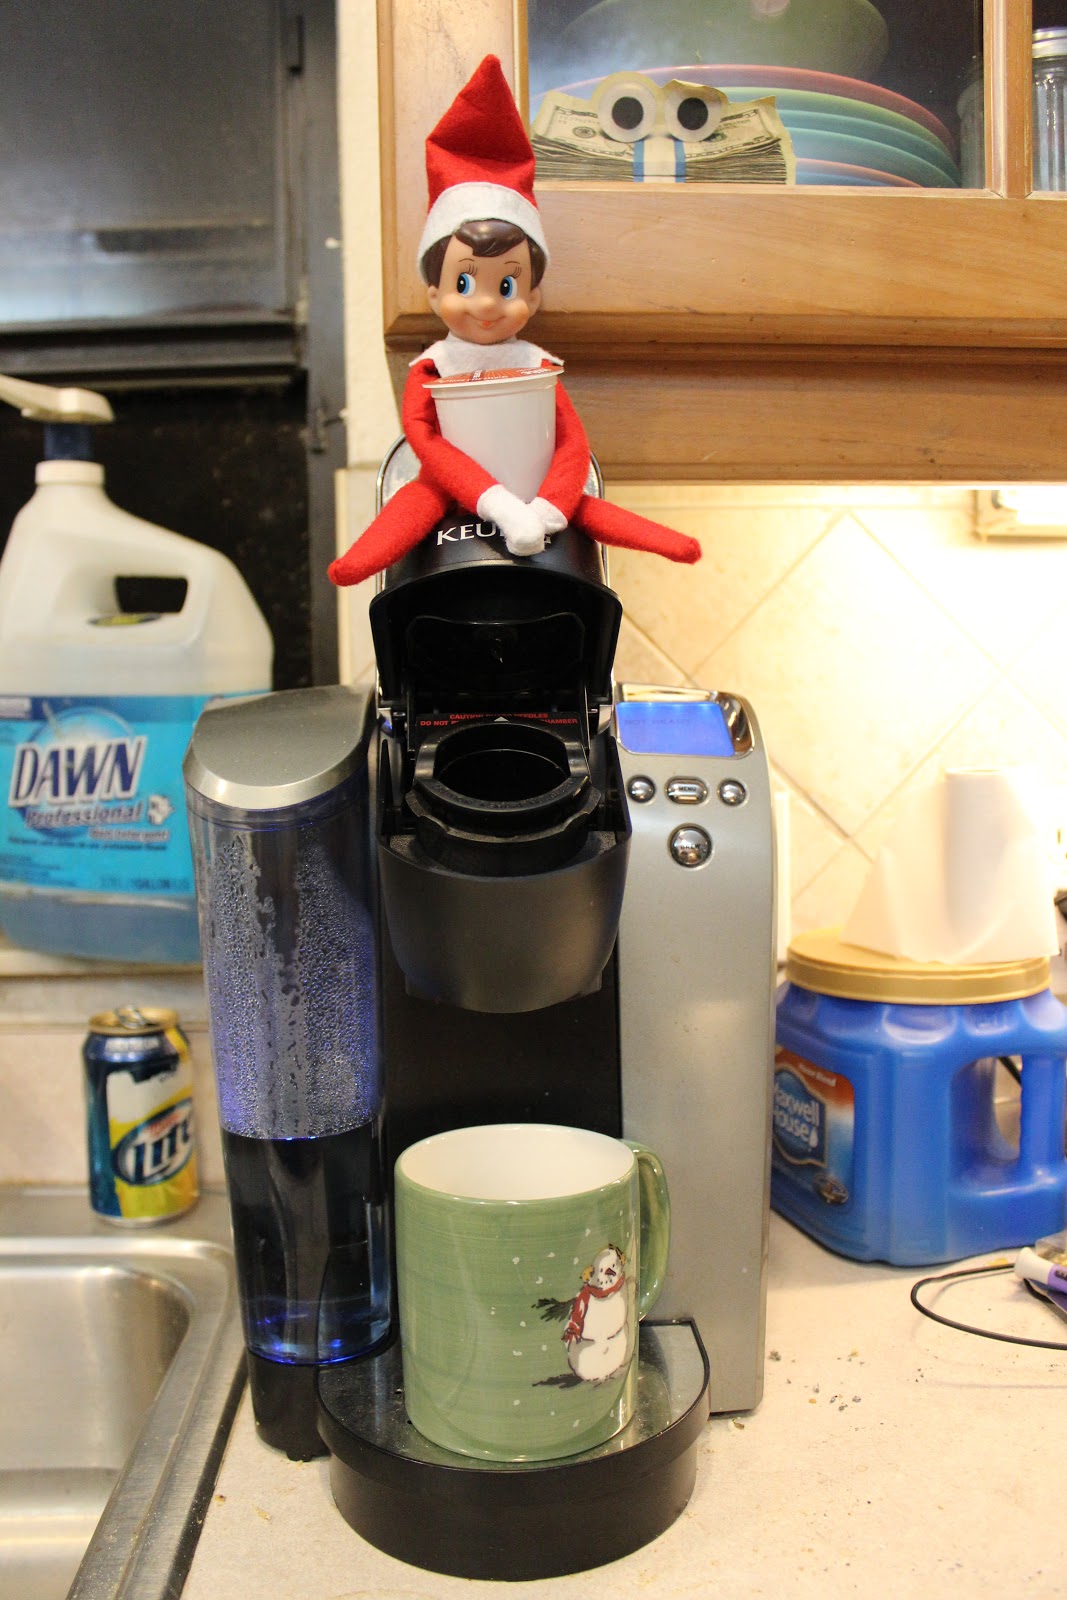
Day 1 - We woke to find Hermie got the coffee ready for my hubby (since he's the first up).


Day 2 - This time Hermie decided to have a little fun and draw on my Step-Children's kid picture we have hanging up in the hall. Cordell, my youngest stepson, said elves aren't suppose to do stuff like that because it teaches bad things. (Such a smart 17 year old LoL)


 Day 3 - Hermie thought it would be a good idea to just hang out today.


Day 4 - Because my older step sons stay up late (got to love a 17 year old and a 20 year old, they never sleep) and my hubby wakes up really early (normally 5/6am) Hermie has to be really quick with his trip to the North Pole. Well this morning, he was trying to sneak a candy cane, but my hubby woke up and caught him stuck in the box.


Day 5 - Today, Hermie watched the whole house from on top of the fire place (I think he was hinting to not having any decorations up yet. I'm still trying to find them all)


Day 6 - Hermie watched himself on TV this night. It was funny because I didn't know Rudolph was going to be until after I found Hermie watching TV earlier in the day.


Day 7 - Hermie got a sweet tooth again and tried to sneak candy out of the candy jar


So Hermie hasn't done too much destruction in my house. Believe me, I talked to him that first night he pulled the disappearing act on me to not follow in his fellow Elves footsteps and to try to keep my home clean. I've already have 3 boys, a husband, 2 dogs, and 4 cats to clean up after. I don't need an elf to add to the mess. So far he's been GREAT! We'll see what happens this coming up week. :)

See Ya.
-Nicole

Friday, November 30, 2012

Pumpkin Cake/Bars

I love this time of year and one thing I love about it is pumpkin. I LOVE pumpkin. I have pumpkin creamer for my coffee, I've made pumpkin muffins (which weren't that good), made pumpkin pie, and now this pumpkin cake. This was my first time making them, I made them for my stepdaughter and her husband for our special Thanksgiving. They couldn't join us for Thanksgiving day so we had a special Thanksgiving the Saturday after. They loved the cake. And my stepdaughter doesn't like pumpkin. But it has the slightest pumpkin flavor, she loved it. So I thought what a great recipe to share to all of you!!

I have no clue where the recipe came from since I got it from my mom and she's had it for so long she doesn't remember.


I have to say this, I had to make this into a cake since I don't own a jelly roll pan. My mom however does and hers are normally "bar" size.

Pumpkin Cake/Bars (from my mom's kitchen)
Bar ingredients
1 cup oil
2 cups pumpkin (or 1 can of Pumpkin)
2 cups sugar
2 tsp cinnamon
4 eggs
1/2 tsp baking soda
2 tsp baking powder
2 cups flour

Icing
3 oz pkg cream cheese (soften)
1 tsp vanilla
1 stick butter (soften)
1 tbsp milk
1 3/4 cup powdered sugar
  1. Preheat oven to 350 degrees F. 
  2. Mix together bar ingredients and put in greased jelly roll pan or a greased cake pan.
  3. For jelly roll pan, bake for 20-25 mins. For cake pan, bake for 30-40 mins (when a toothpick comes out clean).
  4. Remove from oven and cool on cooling rack for about an hour - hour and half.
  5. For icing, mix together and spread on the cake/bars when its cool.

Friday, September 21, 2012

Red Lobster Cheddar Biscuits Copy Cat

The other night I was craving the Red Lobster biscuits. I knew I had a recipe for them that I had never tried so I dug it out and made them. I unfortunately have no clue where I printed this recipe up from (I believe I printed it 2 years ago), so I'm sorry if this is your recipe, I don't know who to give credit to.

And I didn't take pictures sadly. The next time I make them I'll try to take them.

Red Lobster's Cheddar Biscuits
Ingredients:
2 1/2 cups Bisquick baking mix
3/4 cup cold whole milk
4 tablespoons cold butter (1/2 stick) (important that it is cold)
1/4 teaspoon garlic powder
1 heaping cup grated cheddar cheese

Brush on top:
2 tablespoons butter, melted
1/2 teaspoon garlic powder
1/4 teaspoon dried parsley flakes
pinch of salt

Directions:
1. Preheat your oven to 400 degrees.
2. Combine Bisquick with cold butter in a medium bowl using a pastry cutter or a large fork. You don't want to mix too thoroughly. There should be small chunks of butter in there that are about the size of peas. Add cheddar cheese, milk, and 1/4 teaspoon garlic powder. Mix by hand until combined, but don't over mix. (I mixed to where just everything was coated.)
3. Drop approximately 1/4-cup portions of the dough onto an ungreased cookie sheet.
4. Bake for 13-15 minutes or until the tops of the biscuits begin to turn light brown.
5. While the biscuits are in the oven, melt 2 tablespoons of butter in a small bowl in the microwave (I did this in 15-20 sec intervals). Stir in 1/2 teaspoon garlic powder and 1/4 teaspoon dried parsley flakes.
6. Brush the garlic butter over the tops of the biscuits immediately after you remove them from the oven. I used all the butter spread. Makes approximately on dozen biscuits.
7. Enjoy!

I ended up eating 3 in a row. They were sooooooo good!!!

Wednesday, May 16, 2012

Chicken & Cheese Lasagna Roll Up

Monday night I tried a new recipe I found through Pintrest. Needless to say, my family didn't care for it. I ended up throwing most of it away. It lacked flavor, so if I decide to make it again I will be tweaking the recipe more than I did this time. This recipe is from iVillage 

It seemed simple enough and sounded good on paper but it wasn't that great.

This is the finished product


This is the cheese and chicken mixture for the middle of the roll ups.


 It smelled good too.


Here's the recipe if you would like to try. I am open to suggestions on how to "spice" it up.


Chicken and Cheese Lasagna Roll-Ups
Adapted from: iVillage

Ingredients
3 cups chopped chicken (I used 3 chicken breasts)
1 cup Ricotta cheese
1/4 cup shredded mozzarella cheese
1/4 cup grated Parmesan cheese
1/4 cup Milk
1/8 teaspoon white pepper
9 lasagna noodles, cooked and drained
2 cups spaghetti sauce

Directions
1. Preheat oven to 375ยบ F
2. In medium bowl, combine chicken, cheeses, milk and pepper.
3. In a 13x9-inch baking dish, spread 1 cup spaghetti sauce.
4. Spread 1/2 cup mixture on each lasagna noodle; roll.
5. Arrange lasagna rolls, seam side down in sauce.
6. Top with remaining spaghetti sauce.
7. Cover with aluminum foil.
8. Bake for 30 minutes or until hot.
9. Serve, if desired, with additional Parmesan cheese.


Note:
One thing I will do different is add more sauce on top of the rolls. I think that will add more flavor to it.
Please if anyone has any suggestions I could really use them!!

Sunday, May 13, 2012

Pepperoni & cheese rolls

Today Cordell, David, & I went to Epcot. Of course, in our rush to leave the house I forgot to take out the chicken for dinner. So when we came home I had to think of something for us to eat. So I came up with these. (I didn't take pictures while I made them because I didn't think I was going to post about it)

But after I made them and Cordell had 4 of them he told me I better eat otherwise he'll eat them all. So I grabbed 2, and he sneaked behind me and grabbed the other 2. I only made 8, I should have made more. They were that good. So here's the recipe:

Pepperoni & Cheese rolls

2 cans of crescent rolls
8 things of string cheese
Pepperoni
3 tablespoons butter (melted)
1/2 teaspoon garlic powder
1/2 teaspoon Italian seasoning

Preheat oven to 350.

Cut the string cheese in half. Roll the string cheese and pepperoni up in the crescent rolls. Seal around the ends to keep all the gooey cheesy goodness inside. Place on a greased cookie sheet.

Mix melted butter, garlic powder, and Italian seasoning. Brush or spoon mixture on the rolls.

Place rolls in the oven for about 13-16 mins until light golden brown.

I hope you enjoy!!!

Sunday, April 22, 2012

I know it's been a while since I posted anything. I've been kind of busy.

Firstly; David (now 8 1/2 months old) is starting to be very crabby during the day and not napping well. (any suggestions would be wonderful)

Secondly; my sister-in-law and cousin is visiting the end of this month and I'm trying to get their rooms ready and planning stuff for us to do. My cousin hasn't been down to FL ever and my Sister-in-law was last down in 2002 so its been a while. Plus they are only going to be down 4 days so we have a lot of craming to do.

Thirdly; still trying to find a steady job for the hubby (being unemployed really sucks!!!) But he as a contract offer for next month (keeping fingers crossed they don't pull out like the last ones).

I haven't done anything crafty or Pintresty either (which I have a horrible itch to do something soon) but my step-daughter has come to me to help her with wedding decorations she wants for her wedding in November, (EXCITED!!!) so I should have stuff up for that.

But I did get the wonderful chance to FINALLY get accepted to Pottermore (YAY!!!!) so I've been playing around with that. I've been sorted into Hufflepuff house. Which I'm going to embrace. If you haven't joined and is a Harry Potter fan you should. Only the first book is available currently but still you learn a lot from J.K. Rowling herself. It's pretty cool.

I hope to have something to post soon.

David is crabbing again!! GOT TO GO

Tuesday, April 3, 2012

Funfetti Cake Batter Buddies


These are absolutely addicting!!! My husband couldn't stop eating them. (Which made me happy since something I made isn't getting thrown away for a change)

I guess my Funfetti Cake mix didn't have a lot of sprinkles, but it doesn't matter.


They were still amazing!!!


The recipe came from Six Sister's Stuff 

Chex Funfetti Cake Batter Buddies
Adapted from: So Very Blessed

Ingredients:
5 cups Chex cereal (I used Rice Chex)
10 oz (5 squares) vanilla flavored Almond Bark (I used white chocolate bars)
1 1/2 cups Funfetti cake mix
1/2 cup powdered sugar
1 tsp vegetable shortening

Directions:
1. Melt Almond Bark according to the package directions, adding vegetable shortening to thin (I heard that you can make it without the shortening, but it worked great for me to use it).
2. Pour the cereal into a large bowl and drizzle the melted Almond Bark over the cereal. Mix gently with a large spoon or spatula.
3. Dump the cake mix and powdered sugar onto the cereal and mix gently with large spoon until all the cereal is evenly coated.
4. Enjoy!! It's so good! :)
They are extremely easy to make. I'm thinking about using Dark Chocolate and chocolate cake mix next time. Just think of all the possibilities!!!


Marshmallow Delight

 My one step-son, Cordell, absolutely loves anything to do with marshmallows, so when I came across this recipe on Pintrest I knew I had to make it.


I didn't take any pictures of me making it because your hands get a little messy making these. And my finish product "exploded." However they were very good.

Here's the recipe:
From allrecipes


Ingredients
1 (8 ounce) package refrigerated crescent rolls
1/4 cup sugar
1 tablespoon ground cinnamon
8 large marshmallows
1/4 cup butter or margarine, melted


Directions

Separate rolls into eight triangles. Combine sugar and cinnamon. Dip each marshmallow into butter, roll in cinnamon-sugar and place on a triangle. Pinch dough around marshmallow, sealing all edges. Dip tops of dough into remaining butter and cinnamon-sugar. Place with sugar side up in greased muffin cups. Bake at 375 degrees F for 13 to 15 minutes. Serve warm.

I will make these again and hopefully have someone help take pictures.


Also, there is a Easter story behind these as well. Another name for these are called "Empty Tomb". This can be found here: The Girl Who Ate Everything (plus she has better pictures than mine)

Wednesday, March 28, 2012

Gradient Nails

Today I wanted to try something new on my nails. I found this cool design from Pintrest (of course). The pin linked to Laynie Fingers. So I had to try it. First I "washed" my nails with nail polish remover. (I found this helps with the nail polish peeling.) Then I did a base coat, followed by coats of white polish. I also put Vaseline around my nails to help with clean up later (this is a messy process)


Next I put my chosen polishes on a make up sponge (genius!! I know) in the order I wanted them.


Then I squished the sponge on my nail. I did 2 coats of this to give maximum coverage.


As you can see it gets REALLY messy around the nails.


(top photo) This is before a top coat.


When you put the top coat on it cleans up the edges of the colors.

 
Finish look (after washing my hands and giving David a bath, because of course he woke up 20 mins after I painted my nails.)

After letting the top coat dry for about 20 mins I normally run cold water over the nails to try to "freeze" the paint.

My hubby says I'm always doing funky designs to my nails. :)

Tuesday, March 27, 2012

Spring wreath

I made a spring wreath a few weeks ago. I bought the wreath form from Joann's one day and had it sitting around the house. The green ribbon came from Wal-mart (it was in their $1 ribbon bin), the felt flowers and the butterflies came from the dollar store. And the Easter egg is left over from years past. The felt is actually left over from a scrap-booking thing we did during my baby shower. All in all this wreath cost me $12 tops to make. Unfortunately I made the wreath prior to creating this blog so I don't have pictures of the process. Everyone who has seen it says it's cute (now if only my white door would stay clean)

Monday, March 26, 2012

Why do I bake when no one will eat it?

Last week I made hot cross buns (only 6) today I threw 4 away. I don't know why I bake for my family, no one eats it. I wish my parents, sister, and brother lived closer, I know they would eat the stuff I make :(

Tuesday, March 20, 2012

Hot Cross Buns

Last night, I attempted Hot Cross Buns. I know they are normally for Easter but I had a baking itch.

I think they taste a little dry to me but the hubby said they tasted good. Cordell said the middle needs a little something (which in his words means its dry)

Maybe I over-kneaded them? Or added too much flour? I don't know. My buns never got "smooth". I wonder if it would have been better in the bread machine.

 Please if you have a hot cross bun recipe I would love to try it out.


Hot Cross Buns
Adapted from: All Recipes

Makes 6 Buns

Ingredients

  • 2 teaspoons active dry yeast
  • 1/2 cup warm 2% milk (110 to 115 degrees F)
  • 1 tablespoon butter, softened
  • 1 egg
  • 4 teaspoons sugar
  • 1/4 teaspoon salt
  • 1 1/2 cups all-purpose flour
  • 2 tablespoons raisins
  • 1/4 teaspoon ground cinnamon
  • 1 dash ground allspice
  • 2 teaspoons orange zest
  • 1 egg yolk
  • 1 tablespoon water
ICING:
  • 1/4 cup confectioners' sugar
  • 1/8 teaspoon vanilla extract
  • 3/4 teaspoon 2% milk

Directions

  1. In a small mixing bowl, dissolve yeast in milk. Stir in butter, egg, sugar and salt. Combine 3/4 cup flour, raisins, cinnamon, allspice and orange zest; add to the yeast mixture and mix well. Stir in enough remaining flour to form a soft dough.
  2. Turn onto a floured surface; knead until smooth and elastic, about 4-6 minutes. Place in a greased bowl, turning once to grease top. Cover and let rise in a warm place until doubled, about 1 hour.
  3. Punch dough down; shape into six 2-in. balls. Place 2 in. apart on a baking sheet coated with nonstick cooking spray. Using a sharp knife, cut a cross on top of each bun. Cover and let rise until doubled, about 30 minutes.
  4. Beat egg yolk and water; brush over buns. Bake at 375 degrees F for 13-15 minutes or until golden brown. Cool on wire racks. Combine icing ingredients; pipe over buns.

Welcome

This blog is going to be a place to showcase everything Pintrest has inspired me to do. Hope you enjoy.